
The
Ultimate
Navigation
Tool
Aviator
The Aviator is Android application – a navigational tool for all aviators. Its main purpose is to help aviators to enjoy the flight and fly safely. It’s a perfect tool for powered paragliders as well as for powered hang gliders… but it has been successfully used in various airplanes.
The application is in continuous development and it brings new features from time to time 😊
Key Features
-
Zero-touch app. control
...you have all the necessary info on one screen during flight -
Forced on screen
the app will return to foreground after accidental tap / button press -
Google map integration
2 themes: light & dark -
Flight vector
1, 2 and 3 minutes vector -
Air space visualization
supports AIXM, Open AIP and Openair data formats -
Flight plan support
any Google map point as a turn point / destination, main screen progress indicator -
Flight tracking
route recording and export to KML (readable by Google Earth) -
Real time tracking / location sharing
share your location with your group and be visible to other group members -
xcontest.org integration
upload your flights to the xcontest.org server -
Pressure altitude
choose either GPS altitude or pressure altitude in your main view -
Airport information
the AIXM air space format allows showing basic airport info in the map -
Previous flights track
check any of your previously saved flights on the map -
Screen context help
check the ? icon in the screen action bar with screen specific help (where it makes sense) -
Vertical profile
be avare of your vertical situation - are you in / below of an airspace? Are you above the minimal altitude?
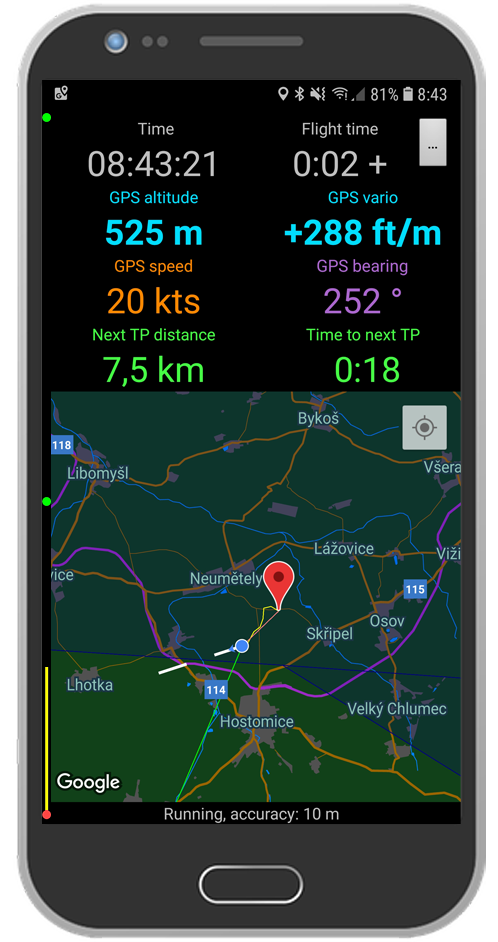
Main screen
The main screen contains all you need for every flight. The actual situation, the way to fly (flight plan / turn points) and the way home (if required).
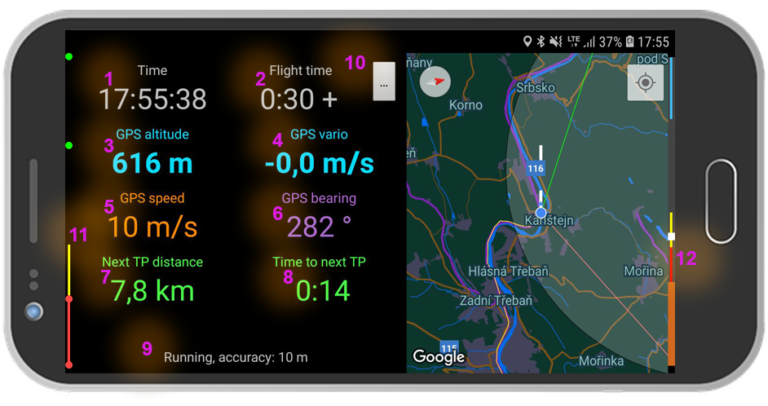
Legend
This is current time view. It’s clickable and it switches between:
- local time
- UTC time (zulu)
- time to dawn/sunrise/sunset/twilight NEW
The last option shows countdown (in format HH:mm) to the key day / night thresholds. The day is split into 5 parts. The view shows:
- before dawn – time to dawn in red
- between dawn and sunrise – time to sunrise in yellow
- between sunrise and sunset – time to sunset in white
- between sunset and twilight – time to twilight in yellow
- after twilight – negative time after twilight in red
The times are computed to the current GPS position and date.
It shows net flight time in format m:ss. It also shows a `+` sign behind the time to indicate flight mode.
The flight mode is set automatically when the GPS speed exceeds 2.5 m/s. And it’s finished when the speed falls below this threshold for more than 30 seconds.
This is actual altitude read either from GPS sensor or from barometric sensor (pressure altitude).
The GPS altitude has a static bug which you need to balance in the application Settings via the GPS altitude correction item. For central Europe it’s -50 meters.
When using pressure altitude it’s necessary to set correct QNH in the respective Settings option.
It’s clickable and it switches unit between:
- altitude in metres
- altitude in feet
This is very simple variometer. It simply compares actual and previous altitude and shows the difference.
It’s clickable and it switches unit between:
- m/s
- feet/minute
Current GPS ground speed indicator.
It’s clickable and switches unit between:
- m/s
- km/h
- knots
- mph
Actual geigraphical track in degrees.
It’s clickable and switches the map view between:
- north mode – north is always up
- flight direction mode – actual flight direction is up, north is indicated by a small icon in the top left corner of the map
This is a distance indicator showing 3 different values:
- Next TP distance – distance to the next Turn Point (green)
- Destination distance – distance to the final destination (green)
- Start distance – distance to flight “home” / the take-off point (red)
The mode could is being switched by the next ‘Time to next TP’ view.
It’s clickable and switches units between:
- km
- nm
- miles
This is view bound to the previous ‘Next TP distance’ and it shows time to one of the:
- Time to next TP – next turn point (green)
- Time to destination – final destination (green)
- Time to start – take-off position (red)
It shows the time based on current speed and also direction. When flying directly to the point the time is just the distance divided by the speed. Otherwise it takes into consideration the direction deviation up to an ‘infinity’ (99:59) when the time is higher or it shows ‘—‘ when flying off the point.
This is just a note indicating status of the GPS receiver and its accuracy.
This is the application menu entry point. You can find there:
- flight menu
- flight plan menu
- air space settings menu
- Settings menu
- Full version menu
- About screen
The menus andother application functionality is described in other web pages (see the top menu).
Overall flight plan progress. It shows flight start / take off point as the bottom red dot, destination as the top green/red dot and list of intermediate turn points in between.
Red dots and bars represent passed turn points and legs. Yellow bar represents current leg. Green dots represent next turn points and destination.
The vertical profile indicates current vertical situation and your position related to ground, minimal altitudes and any airspace crossing.
It’s based on your current altitude and ground level / altitude. The ground level / altitude is obtained from Aviator online(!) service which stores world wide matrix of ~230x230m squares with known altitude. The actual ground level / altitude is approximated using this matrix. It makes a short network request each time you cross current square edge to download new altitude matrix for calculation.
Please note that it is NOT precise, especially in a hilly areas!
The following is indicated:
- white square – you / your “relative altitude”
- wider brown bottom bar – this is the ground level/altitude
- red bar – minimum flight altitude over open terrain (by default 150m)
- low yellow bar – minimum altitude over built up areas (by default 300 m)
- blue/green/… – other colors represent various types of air space
If the white square is in the grey area then you are flying high “enough” and out of any air space. If you are in the yellow or red area you are flying too low (fine for take-off and landing of course), if you are in any other color, you are in some air space.
The yellow and red altitudes can be set in the Settings screen in the Vertical profile section.
Map view
The map view shows actual flight situation. It’s built on top of Google maps. As you can see the map view could be displayed in 2 different themes – the dark one and the light one. It’s on you to choose what’s better for you in the application Settings screen via Dark map theme option.
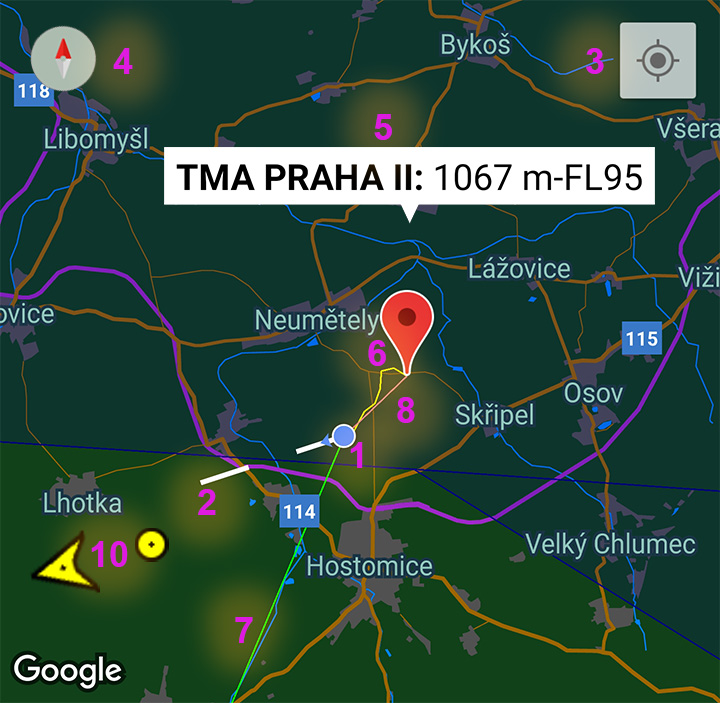
Legend
This is your current location. During the flight it’s normally shown in the center of the view. You can move and zoom (limited zoom levels) the map at any time.
There is a timer configurable in the Settings screen called Map location timer which always returns the view to your current location after configured number of seconds. It could be switched off by setting a zero value (not recommended).
This is a speed vector divided into 2 parts indicating your position in one, two and three minutes if flying the current speed and direction.
This is a standard Google map icon which moves the map view back to your location (without waiting for the timer mentioned in previous point).
This indicator is only shown if the map view is NOT oriented to the north. Click on it to rotate the view back to the north.
You can switch between north and flight direction modes by clicking to the GPS track view (see the Main screen section, item 6) GPS track above).
If you have an airspace loaded into the application you can click to any point in the map and you’ll get a list of air space configuration at this location. It shows air space:
- type (CTR, TMA, TRA…)
- name
- bottom altitude (AMSL – default or AGL) / flight level
- top altitude (AMSL – default or AGL) / flight level
The AMSL / AGL altitude units correspond to the unit chosen by the GPS altitude view (see the Main screen, item 3) GPS altitude).
You can manually de/activate temporary restricted / segregated areas in the Air space setup screen. The areas set as inactive are shown in italic.
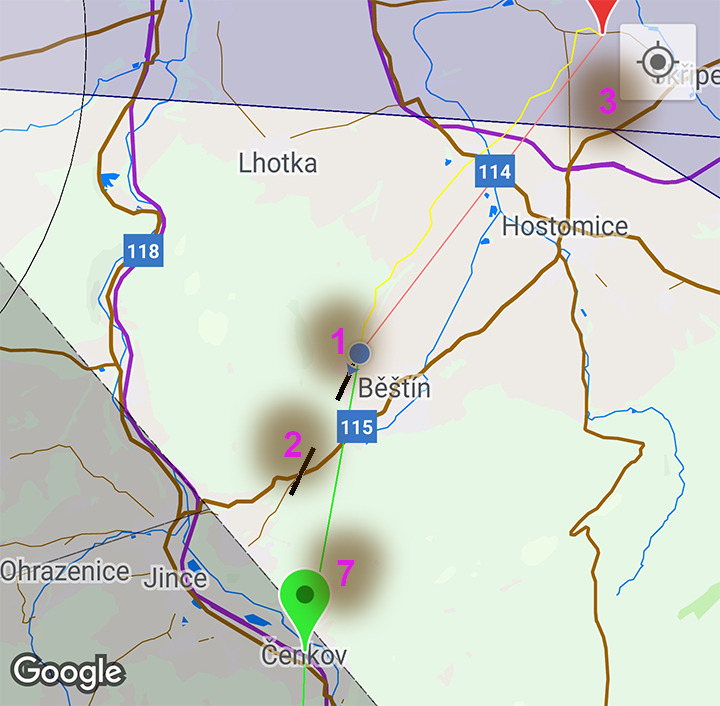
The yellow path shows your flight path from take-off to landing. One flight could be compound of multiple flight segments (you can land, move and then take-off again). The segments are connected with a direct dotted yellow path. Any movement between the segments is not being recorded.
You can store/save and start new flight in the Flight menu.
The red and blue points show the take-off (red) and landing (blue) locations. Your flight could be compound of multiple segments where each of them has its own take-off and landing point.
When you click on them you’ll see time if the take-off / landing.
The green line shows your flight plan – the list of turn points defined in the Flight plan menu. The line always starts in your actual location and points to the next turn point.
If the flight plan is empty, it’s not shown.
When flying the turn points are automatically switched once you reach the actual turn point at the configured distance. Check the Settings screen, the FP turn point radius option.
The Main screen views Next TP / destination distance and Time to next TP / destination show distance and time (when flying towards) of the next turn point or to the final destination (green).
The green spots show the turn points.
When you click on them you’ll see the spot name.
The red line shows you direct way to “home”, to your take-off point.
The Main screen views Start distance and Time to start show distance and time (when flying towards) of the “home” location (red).
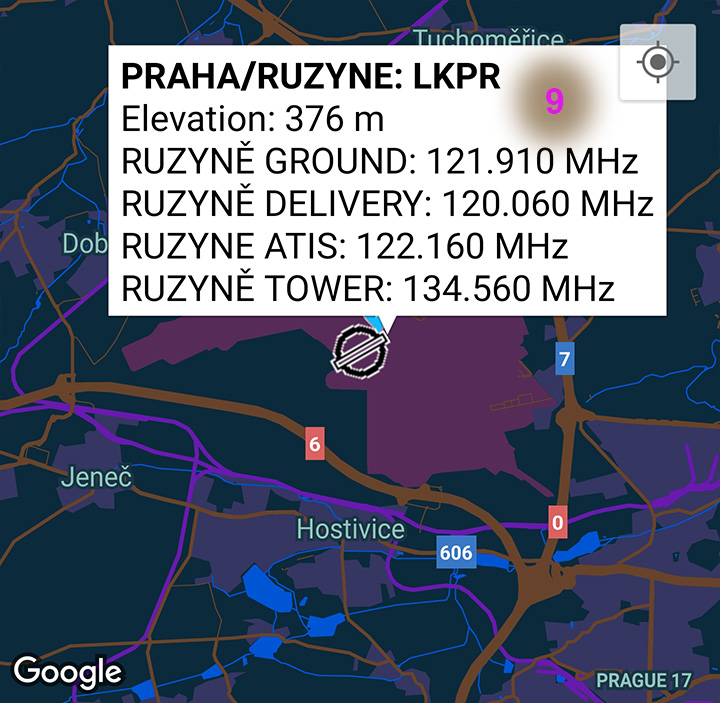
When using the AIXM/OFMX or Open AIP data format for the airspace you can see also all the airports defined in the file with some basic information when you click on it. You see:
- airport name
- ICAO code of the airport (or ultralight area)
- airport significant point altitude (center, not runway threshold)
- list of relevant frequencies (ground and tower level plus ATIS and other VFR related)
- runway designation
- length (in meters or feet depending on the current active altitude units)
- surface type (GRASS, ASPHALT, CONCRETE or ? if unknown)
- magnetic bearing (if available)
When the Real Time Tracking / location sharing is on you can see other pilots as the yellow circles (when on ground) or arrows (when flying) indicating direction of flying.
If you tap on the icon you’ll see pilot’s:
- nick name
- current altitude
- actual speed
- direction of flight
Free vs. Full version
When you download the application it works in a free mode. It has full functionality, just some small pieces are disabled.
You can enable them by buying a full version. You can do it directly inside the application in the respective Full version menu. It will cost you a value of approximately 8 bucks a year.
I believe that this is a reasonable price for such tool. It will help further development and support of the application.
Free version
-
Flight plan
...you can only create one turn point
-
Air space loading
...only the Openair data format is available
-
Air space setup
...all temporary restricted / segregated are always shown as active
-
Real time tracking / location sharing
...not available
-
xcontest.org integration
...not available
Full version
-
Flight plan
...you can create unlimited number of turn points
-
Air space loading
...AIXM (including airport info), Opean AIP (including airport info!NEW!) and Openair data formats fully available, Open Flightmaps air space downloader -
Air space setup
...you can de/activate each temporary restricted / segregated air space -
Real time tracking / location sharing
...fully available
-
xcontest.org integration
...your flights could be uploaded to the server and registered in your contests
- The Full version is being managed by Goole Play services as a yearly subscription. In order to purchase a subscription your credit card has to have enabled so called MO/TO payments. If your payment fails, check your card settings in your internet banking or in your bank / card issuer and enable the MO/TO payments.
Use the application - plan a flight... and fly!
This is a set of hints or recommendations on how to use the application, how to prepare your flight and how to use the application during the flight. The text is NOT a comprehensive list of actions you should do. You are a licensed pilot so you know how to prepare for your flight!
Before flight
- First of all you should ensure that you are using the latest and actual air space configuration; download the air space definition file in any of the supported format and load it via the Air space screen into the application
- De/activate temporary restricted / segregated areas in the Air space screen for the actual day
- Flight plan – plan your flight, your route according to the air space and other regulations – define a set of turn points and put them into the application via the Flight plan screen
- Calibrate the ground GPS altitude via the GPS altitude correction option in the Settings screen
- Charge fully your device – the GPS receiver usually drains the battery
Before take-off
- Launch the application
- Set the right units for altitude, speed and distance
- Disable screen lock so you don’t need to enter any PIN or other code when accidentally lock the screen during the flight
- Setup Location sharing if you want to share your position with other pilots
During flight
You don’t need to do ANYTHING 🙂
Just watch the main screen – you have all the information you need for your flight on one place – on the screen.
However of course the application is fully interactive during the flight so you can do whatever you want (except few intentionally disabled functions)… and you can be sure that the application will always return back to the main screen with your position in the middle of the map view.
You CAN:
- check the airpsace
- check airport info
- change the distance / altitude / speed / vario units
- …
After landing
Your flight is now automatically stored after landing. So you can see the flight details, full track any time later. You can export the flight into KML and see it in the Google Earth or you can upload the flight to the xcontest.org server…
Limitations
Please note that the Aviator mobile application is provided AS IS without warranty of any kind. This application doesn’t fulfill any formal requirements and/or regulations and can’t be formally used as a replacement of officially required flight equipment! Author of the application and this web site does NOT accept any responsibility or liability related to using the application.
Some key aspects you have to realize before and during every flight (or any other application usage):
- The application is using device's non-certified and potentially non-precision GPS and similarly potentially non-precission pressure sensors sensors for all the positioning and movement data (location, altitude, speed, bearing, climb/descend rate) with all the possible consequences of this fact (e.g. entering controlled / restricted area without permission).
- Please realize what type of altitude you are using and displaying on screen. When using GPS altitude it's more or less OK below the transition level, it's however definitely not OK above the transition altitude (where airplanes use flight levels on standard QNH 1013 hPa / 29.92 inHg instead of AMSL altitude) - especially when flying close to bottom border of a controlled airspace and in low pressure weather (below the standard pressure). When using pressure altitude don't forget to set correct local (area) or standard QNH in the settings!
- The installed air space file might not correspond to the real air space configuration. There is no (free!) automatic and reliable update functionality implemented. Always verify your flight plan against the official materials of your national aviation authorities, check actual status of all relevant temporary restricted / segregated areas, check NOTAMs, local procedures etc. This application does NOT contain such information!
- The Vertical profile service shows only approximate / interpolated ground level / altitude. It calculates actual value from a matrix of cca 230x230 metres ground level matrix. And it could be very imprecise in hilly areas. Use this information only as a helper information. That's why it doesn't show any numbers. It's just for a high level awareness.